Audi TT MK1 8N Leather Repair And Recolouring
Before & After
The Challenge
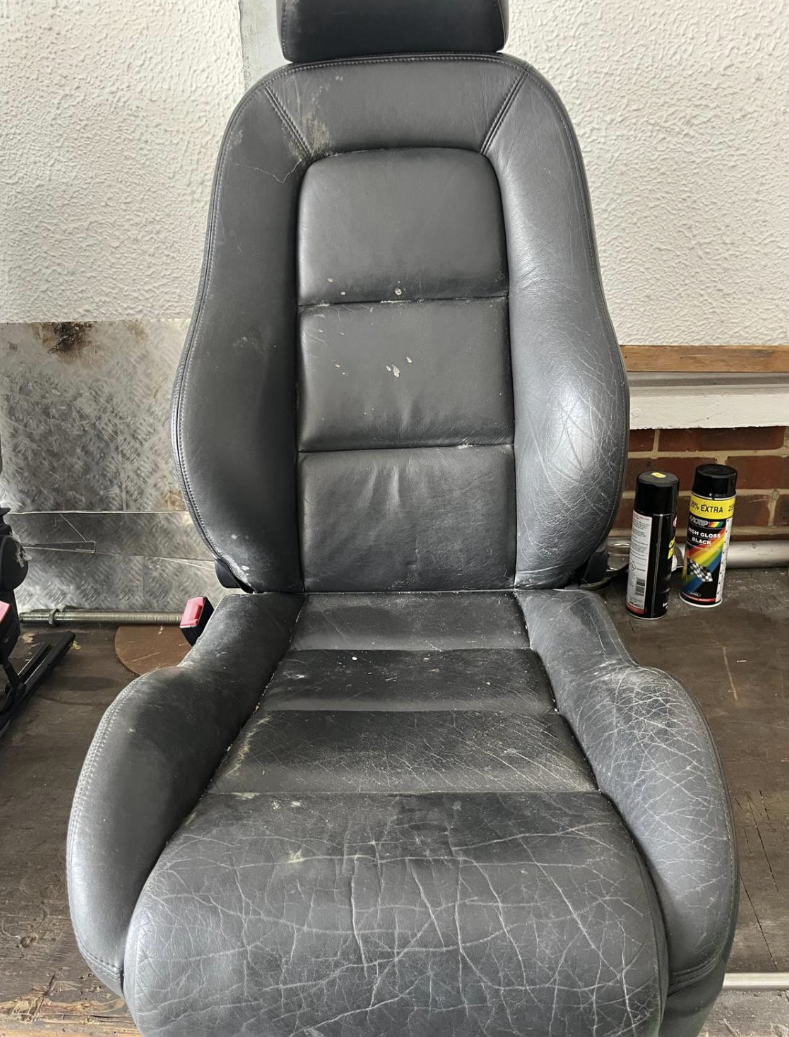
A local client from Epsom reached out about leather auto upholstery repair for an Audi TT MK1 8N, which had clearly seen a lot of life. The black leather seats had gone stiff and dull, and those small cracks that start on the side bolsters had started spreading further than they liked. You could tell the car had been looked after — just not the seats.
He told us he wanted the interior back to how it was when they first bought the car. Not just tidy — proper. That firm, slightly dense feel Audi leather has when it’s new. Nothing shiny or soft; just that factory finish.
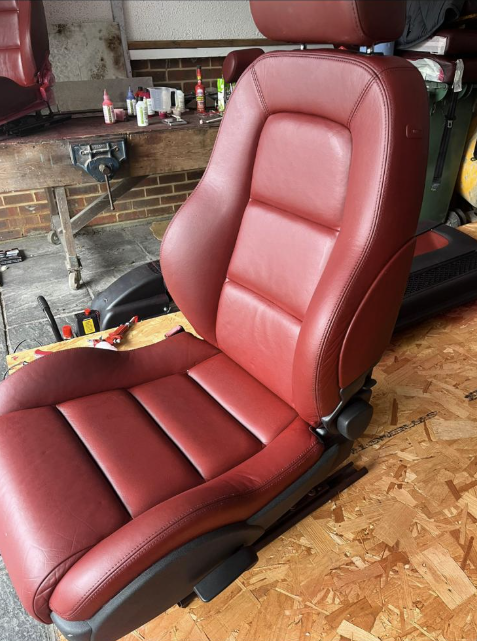
So, our job was simple in theory but tricky in practice: bring the seats back to life, keeping that solid factory feel, and give it a new lease of character with a subtle maroon recolour that still felt true to the car.
Our Process
1. Getting Started
We stripped the seats down, gave them a thorough clean, and removed the old coatings that had built up over time. Once we had the bare leather in front of us, we could see the true condition — cracked grain, surface wear, and a few spots where the pigment had completely lifted off.
2. Repairing the Surface
Each damaged area was rebuilt by hand using a flexible filler compound. It’s slow work, layering and sanding between coats, but that’s what makes the finish last. We paid special attention to the driver’s side bolster — it always takes the most punishment — and restored its shape so it didn’t sag or feel hollow.
3. Mixing the Colour
The client fancied something a little richer this time. We mixed a custom maroon pigment by eye, adjusting it under daylight until it had just the right depth. Not too red, not too brown — a proper, classy tone that would sit nicely with the car’s styling.
4. Recolouring & Sealing
The colour was airbrushed in thin layers, allowing each coat to cure before applying the next. That’s how you get depth without losing the leather’s texture. Once the colour was spot-on, we sealed it with a matte lacquer for protection — no gloss, no plastic look, just a clean, even surfaced leather repair that feels natural to the touch.
5. Final Details
Once dry, we did a final round of blending to even out the tone across panels. You can feel the difference straight away — the leather was supple again, but with that firm, structured feel that makes the Audi TT interior so distinctive.
The Result
The transformation was immediate. The once dull, tired black leather now carried a deep maroon tone that gave the whole cabin a lift. It looked refined but still original — not like it had been redone, just like it had been looked after properly since new.
Our Epsom client was delighted. Their exact words were: “That’s exactly how it felt when I first sat in it — solid, not soft. It’s perfect.”
Location: Leather seat repair in Cobham
Vehicle: Range Rover
Issue: Jeans dye and abrasive cleaner damage
Process: Cleaning, prep, custom colour match, re-pigmentation, lacquer, and airbrush blending
Result: Factory-quality restoration with a smooth, durable finish
For more information on our work visit our projects page to see what we’re up to.
We carry out this kind of work all over the South East, not just in Epsom. Over the years we’ve helped countless owners with leather interior repair for cars in Surrey, everything from modern SUVs to older convertibles that need a bit of care.
We also take on leather vehicle upholstery repair in Sussex, where sunlight and age can really take their toll on interiors, and plenty of vehicle leather seat repair in London, where daily driving and city wear often leave seats looking tired.
No matter where the job takes us, the approach stays the same — careful restoration, proper materials, and a finish that feels as good as it looks.